|
Working With Aluminum Skins
These tips for bending and joining the aluminum
skins of your kitplane will really pay off in
saved time, effort, and frustration.
Bending
Trailing Edges
 I
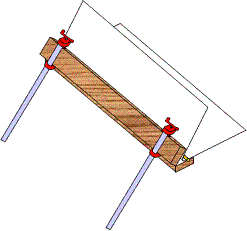
made a bending jig using two 2x4s
and some door hinges. I
was worried about bending the trailing edge
into too tight radius, so I put a small wood dowel into the bend of the
skin
while I worked the bend. But
I couldn’t
get enough leverage to bend the trailing edges.
So I clamped two bar clamps onto the top 2x4
to give me
more leverage. I
also used C-clamps in the middle to get
even pressure across the trailing edge.
This worked well.
Bend
slowly,
and check often until you get a good fit.
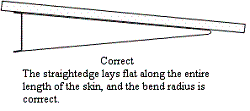
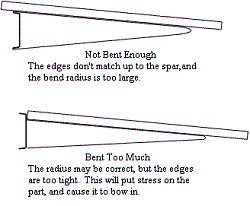
The aluminum skins should lay flat and just
touch the main
spar
without you
having to push. Don’t
over-bend, or your
skin will want to bow in instead of laying flat. I
made a bending jig using two 2x4s
and some door hinges. I
was worried about bending the trailing edge
into too tight radius, so I put a small wood dowel into the bend of the
skin
while I worked the bend. But
I couldn’t
get enough leverage to bend the trailing edges.
So I clamped two bar clamps onto the top 2x4
to give me
more leverage. I
also used C-clamps in the middle to get
even pressure across the trailing edge.
This worked well.
Bend
slowly,
and check often until you get a good fit.
The aluminum skins should lay flat and just
touch the main
spar
without you
having to push. Don’t
over-bend, or your
skin will want to bow in instead of laying flat.
 
Bending
Leading Edges
 This
took a lot of forearm strength. Just
like any other
bending you do, do a
little at a time, checking the fit often.
I used the ¾” pipe from my pipe clamps to roll
the edges. I don’t
think the diameter
of the pipe is critical,
as long as it isn’t too big. I
duct
taped it to a skin, and put that side down on the workbench. Then I clamped a pair of
vicegrips to either
end of the pipe to use for leverage.
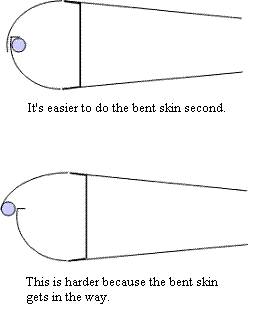
I
started with the skin that did not have the bend.
That way when I rolled the second side, the
bent skin didn’t get in the way. Since
the
bent skin goes on the inside, I was able to roll it past the first side
and let
it bounce back to the correct position with the first side out of the
way. This
took a lot of forearm strength. Just
like any other
bending you do, do a
little at a time, checking the fit often.
I used the ¾” pipe from my pipe clamps to roll
the edges. I don’t
think the diameter
of the pipe is critical,
as long as it isn’t too big. I
duct
taped it to a skin, and put that side down on the workbench. Then I clamped a pair of
vicegrips to either
end of the pipe to use for leverage.
I
started with the skin that did not have the bend.
That way when I rolled the second side, the
bent skin didn’t get in the way. Since
the
bent skin goes on the inside, I was able to roll it past the first side
and let
it bounce back to the correct position with the first side out of the
way.
I
rolled the skin, making sure to keep down
pressure while I rolled. If
you just
roll the skin without the down pressure, you will get a bend in the
skin where
the main spar ends. I
worked the flat
side until it was in about the right position, then flipped the entire
thing
over and did the bent side. Once
they
were as close as I could get them with the roller, I hand messaged them
until
the rivet holes lined up nicely.
Skin
Lap Joints
The
metal of the aluminum skins is so thin, that when you rivet them
together, the
edge of the outside skin will curl up. To prevent this, put a
very small bend about ¼” from the edge of the skin. If you
have a break, you can use it for the straight edges, but I found the
easiest way was to use the vice grip type edge-rolling tool.
(See Tools)
Make
sure you do this step
before you dimple. The dimples will get in the way for
bending, but the bend will not interfere with dimpling.
You
should do this to every outside edge of every skin. For
example on the F-824 skin, the bottom and aft edges need bending, the
front and top will be covered, so do not. Don’t
forget the aft end of the FL-801 flap top skins, or the leading edges
of the rolled control surfaces.
Countersinking
I
used a scrap piece of thicker aluminum to help set up my
microstop. I put a bit in the microstop, and the microstop
into the drill. I then set the microstop by eye to what
looked right, or just a little under the correct depth, and drilled a
test countersink. If it was too shallow when tested with
either a rivet, or a dimpled piece of the correct thickness of
aluminum, I reset it a little deeper and repeated until it was right.
On
subsequent setups, I started setting the depth by pushing the bit into
a correctly countersunk hole and setting the microstop to be flush with
the surface. Then tested on a scrap and made adjustments if
needed.
You can freehand a countersink without a
microstop. There were a few places I had to so this because
my microstop wouldn’t fit. I mounted the bit in either my
90-degree angle drill or my deburring tool. Then carefully
and
slowly drilled or spun the bit until I had the desired depth.
Take this slow, it is easy to remove too much metal.
Return
from Aluminum Skins
to Tools and Tips
Return from Aluminum Skins to Kit Plane Advice Home
|


 I
made a bending jig using two 2x4s
and some door hinges.

 This
took a lot of forearm strength.