Canopy
For me, installing the
canopy was the scariest part of
building my RV-8. I
think I was nervous
because there was a point of no return once I start cutting the bubble
in two,
and if I made a mistake I would have to spend another $1000. But I took it slow and
made sure I was ready
for the next step before I started, and it turned out fine.
Slide Rails
 I
drilled and screwed the
C-804/C-805 canopy rail completely
on at this point. Then
when I had
finished the installation, I found that the anchor pin on
the frame that fits into the C-806 anchor block scraped the
top of the rail. So
I had to remove it and
grind down the top
just a little. If I
were doing it again,
I would only put in a few of the screws that hold the rail in place,
making it
easier to remove later if needed. I
drilled and screwed the
C-804/C-805 canopy rail completely
on at this point. Then
when I had
finished the installation, I found that the anchor pin on
the frame that fits into the C-806 anchor block scraped the
top of the rail. So
I had to remove it and
grind down the top
just a little. If I
were doing it again,
I would only put in a few of the screws that hold the rail in place,
making it
easier to remove later if needed.
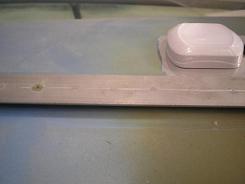
I know you
aren’t ready to paint the side rails yet, but
since I am on the subject of rails, I’ll mention it now. I painted mine, and I
believe I will have to
constantly maintain the paint job as it gets worn by entering and
exiting the
cockpits. I have
since seen some side
rails that were just polished aluminum, and they looked really good. If I were doing it again,
I would not paint
my rails; I would just polish them.
Canopy Frame
 I spent a lot of time
working the frame to fit as close as
possible all the way around. I
started
at the front and worked my way back.
But
when I made a tweak at the rear, it often effected the front. I was able to make some of
the tweaks with
just my hands, but when it came to the aft end of the frame, I needed
more leverage. I
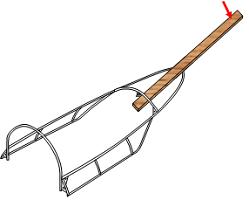
used a 2x4 below the rail next to the
WD-640H and above the aft rail to bend the aft rail down enough to get
the ¾ to 5/8 inch gap above the C-804 slide cap. I spent a lot of time
working the frame to fit as close as
possible all the way around. I
started
at the front and worked my way back.
But
when I made a tweak at the rear, it often effected the front. I was able to make some of
the tweaks with
just my hands, but when it came to the aft end of the frame, I needed
more leverage. I
used a 2x4 below the rail next to the
WD-640H and above the aft rail to bend the aft rail down enough to get
the ¾ to 5/8 inch gap above the C-804 slide cap.
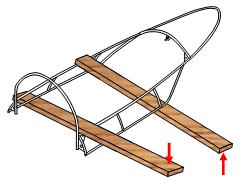
 I
also needed the 2x4s to remove a little bit of a twist that was in the
frame. Initially
one side of the frame
was higher above the fuselage that the other side.
So I put one 2x4 over the left side and below
the right side at the front of the frame and another under the left
side and
over the right at the rear of the frame.
Then I pulled one up and the other down to
twist the frame. I
also needed the 2x4s to remove a little bit of a twist that was in the
frame. Initially
one side of the frame
was higher above the fuselage that the other side.
So I put one 2x4 over the left side and below
the right side at the front of the frame and another under the left
side and
over the right at the rear of the frame.
Then I pulled one up and the other down to
twist the frame.
I kept working the frame
until I had:
- All six
temporary .040 strips touching the fuselage, one at each down tube on
the frame
- The lower
frame rail parallel to the slide rail
- The aft end
of the frame the required ¾ to 5/8 inch gap above the C-804
slide
cap
Aft Canopy Stop
Before you permanently
install the side rails, think about a
stop for the aft end. If
you don’t put
something there, the canopy will slide all the way aft until the handle
hits
the F-807 bulkhead.
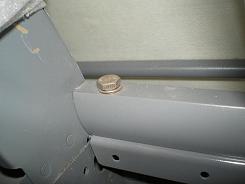
 I have seen two clean,
cheap and easy stops. One
was just a bolt and nut installed through
the C-803 side rail. The
nut was inside
the rail, and stopped the C-658 roller from going any farther aft. I initially tried this
with a bolt in the
hole I had to drill for the aft most screw shown in Detail B, DWG 44. This worked great until I
installed the
handle and discovered it wasn’t far enough forward. I have seen two clean,
cheap and easy stops. One
was just a bolt and nut installed through
the C-803 side rail. The
nut was inside
the rail, and stopped the C-658 roller from going any farther aft. I initially tried this
with a bolt in the
hole I had to drill for the aft most screw shown in Detail B, DWG 44. This worked great until I
installed the
handle and discovered it wasn’t far enough forward.
The second stop I have
seen is just a short piece of rubber
hose slipped inside the side rail.
You
will have to slip it in before final installation.
The diameter of the hose was large enough to
keep it from falling out, and it was long enough to stop the C-658
roller
before the handle hit the F-807 bulkhead.
Now that the canopy frame
is done, let's look at the actual plexiglass
bubble.
Return
from Canopy
to Finishing Kit
Return from Canopy to Kit Plane Advice Home
|


 I
drilled and screwed the
C-804/C-805 canopy rail completely
on at this point.
 I spent a lot of time
working the frame to fit as close as
possible all the way around.
 I
also needed the 2x4s to remove a little bit of a twist that was in the
frame.
 I have seen two clean,
cheap and easy stops.